- Well Equipped
- Season 1
- Episode 39
5 High-End Kitchen Gadgets Tested By Design Expert
Released on 06/08/2023
I'm Dan and I've been designing kitchen gadgets
for more than 40 years.
I'm gonna test some kitchen gadgets
from some high-end brands
and see if I can find a way to make them better.
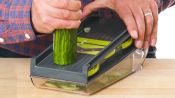
We're gonna create a larger area for the vegetable,
maybe have it come all the way to the edge
just to give this a little bit of a waist.
These are the gadgets I am going to test.
HORL 2 Knife Sharpener,
Forma Cheese Grater, Apostrophe Orange Peeler,
Cast-Iron Spice Grinder, Toss & Chop Scissors.
[upbeat music]
HORL Knife Sharpener.
This is the HORL Knife Sharpener.
It uses the power of diamonds, ceramics, and magnets
to help you sharpen your knives.
This block is magnetic on both sides.
One side is 20 degrees, the other side is 15 degrees.
20 degrees is for your everyday use of sharpening.
15 degrees will give you an even sharper edge.
This roller cylinder has two sides.
One has a diamond coating.
It feels a little bit like sandpaper.
And this side is a smoother ceramic surface.
I wanna show you how this knife is gonna cut
before we sharpen it.
It's okay, it's not in bad shape.
I'm going to place this against the magnet,
start with the diamond side.
[metal scraping]
Now, this knife, I'm getting almost to the edge,
but not completely to the edge.
I'm missing maybe two centimeters or so.
Let's try the ceramic side.
[metal scraping]
Something a little disconcerting
about a knife being face-up,
especially when my hands are going back and forth,
I am being really careful, but still it is...
I'm very conscious of the fact that this blade is facing me.
Let's try side number two.
Again, I'm using the diamond side to start with.
[metal scraping]
And I'm gonna try now the ceramic edge.
[metal scraping]
Okay, I'm gonna stop there.
Let's see what kind of improvement we made.
So you probably can't see this,
but I can feel that it's sharper than before.
It starts to cut very easily.
Let's see how that compares
with using the coarser and finer side
of a relatively inexpensive whetstone.
[jaunty music]
Let's give it a try.
Well, this feels sharp as well.
It may be a little sharper.
Let's give this an effectiveness rating.
I'm just gonna give it a four out of five
because I'm a little concerned
that it didn't quite get to the base
of the knife that I was sharpening.
And other knives in your drawer may be taller or thicker.
It's not gonna get to those edges as easily.
In terms of usability,
it felt like I was putting myself in a little bit of danger.
I'm gonna give it a three out of five,
and that may be a little bit generous
'cause I don't want anybody to cut themselves.
I want to address that in the redesign.
Let's talk about a redesign
and a couple of things came to mind as I was using it.
I think the magnet is strong enough.
The magnet works really well,
and, of course, it's gonna hold the blade at that angle.
The thing I was a little concerned about,
maybe I should say very concerned,
is the fact that my hand
was moving this way towards the blade
and I had to push.
So it would be really simple
just to give this a little bit of a waist,
a little skinniness in here
that will give me a little bit more security
when my fingers are pushing that way.
The other thing is it's not accommodating larger blades.
I know if I get a larger knife than I had,
it's not gonna be tall enough.
There may be a way to put this on a surface
to make this higher to get the edge of the blade,
but that's improvising a little bit.
So as this rolls along the table,
it is gonna sharpen the tip here,
but where we wanna start cutting very often is this part.
I think we either need a bigger diameter here
or we need some way to raise this,
so we can get larger blades.
Let's talk about a buy rating,
and I'm gonna give it a two out five.
It's not for everyone, it's not for every size knife,
and I think you're gonna be a little disappointed
when they get at home.
I just don't think it's a cut above the rest.
Forma Cheese Grater.
This is the Forma Cheese Grater.
It claims to perfectly grate your cheese
while looking like a beautiful modern art piece
on your table.
Okay, let's start grating, I have some Parmesan cheese.
Unlike other cheese graters,
this actually has different sizes of blades,
so it's gonna result in different coarseness
of grated cheese.
There is a hole in the back.
It's gonna start in here until we're done.
Then, we'll pour some out.
Now one thing you may wanna know
is this cheese grater cost $95,
so the grated cheese better be worth it.
If I'm gonna use my right hand to grate cheese,
I will be grating in the, I guess, up direction.
If I wanna catch the grated cheese.
I feel like, though, I would be want to grate it down.
And when I do that, it's gonna start to pour out.
That could be okay, too.
Okay, it's grating the cheese, I'm not sure how much yet.
[plate clattering]
Let's see what we have.
It's not coming out too easily,
but maybe that's an advantage for sprinkling over the food.
And I can't quite tell if I'm done.
I think I am.
There are some powdery bits and some larger bits.
So it is unusual in that respect
in that most cheese graters have one size only.
I think in order to appreciate this,
you really wanna look at it more than music.
Let's see how the beautifully aesthetic
$95 Forma Cheese Grater
compares with a plain old box grater.
[jaunty music]
Well, that worked just as well.
The advantage is the cheese here is consistent in size.
Let's give this an effectiveness rating.
On a scale of one to five, I would give it a three.
I thought it grated cheese okay.
I took a bit of work to do it.
The fact that the blades are all different sizes
isn't quite right depending on what you're cooking.
I would actually want to choose one size
and stick with that.
It is time for the left-handed oil test.
I take my non-dominant hands.
It's a very, very quick way
to simulate what it may be like to use this product
for someone who may have dexterity problems, hand problems,
or they simply have slippery hands in the kitchen.
Let's see how it goes.
And it is a bit out of control.
It's hard to tell, but in order to compensate,
I'm squeezing this much tighter
than I feel like I should be.
It's a little awkward.
Concern would also be that it's a little bit wide
for smaller hands
'cause my hand is pretty much outstretched.
My fear is that with the smaller hands,
it's gonna be fingertips,
and that's gonna be a lot more slippery
and a lot less power to do some squeezing.
I think for some people, this may have some issues.
So for a usability rating, let's give it a two out of five.
It's a little awkward.
I'm concerned about smaller hands.
It's definitely slippery.
It just makes me wanna tone down the rating.
So two out of five.
So let's hop into the redesign.
This was actually designed by Zaha Hadid.
She was an architect,
very-well known for some more amorphous shapes,
and this certainly follows suit.
However, I think it would've benefit
from a few more usability studies.
One thing I would do here is downsize a bit
or I think I would just go a little bit shorter on one end.
I'm not sure if you could see this,
but there's a second little shelf here,
so I'm gonna make that shelf a little bit shorter.
I'm not sure what to do about the hole sizes.
I think I would make them consistent
or at least not be so radically different
because if you're cooking something
and you want it to melt evenly,
you want the coarseness of the cheese to be consistent.
So I would make those at least closer in size.
I would consider dipping this in,
and I think it's gonna get your fingers around here
a little more securely
or your palm into here a little more securely
because I would consider this inside as well
to have a little bit of a subtle indent.
Doesn't need a lot to be secure
but I do feel like this is holding a slippery bar of soap
when I'm using it.
Some shape to this would help alleviate the fact
that I have to squeeze it so hard to hold it steady.
The other thing I would watch and have to think about this
is what to do about this exit hole in the back.
Right now, the exit hole looks like this.
I think I would've considered
a more organic-looking pour spout.
Maybe have it come all the way to the edge,
so that it doesn't pull up in the bottom here.
You can give this more of a spout
and not only to work better,
but also look like that's where the cheese is coming out.
From here, it looks sort of like an accident.
So this design has good intentions.
It depends if you wanna look at your cheese grater
or a grated cheese with it.
For buy rating, I would give the Forma Cheese Grater a one.
It doesn't grate cheese as easily.
I'm not sure you would actually use it
if you had it at your house.
Considering that you're buying it for $95,
you can probably spend your money better elsewhere.
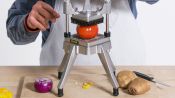
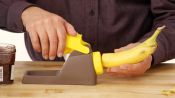
Apostrophe Orange Peeler.
This is the Apostrophe Orange Peeler.
This gadget claims to peel your oranges easily
with its rather unique design.
Let's give it a go.
There's a little hook here, it's maybe hard to see,
but it is sharpish at the bottom part of that hook.
And as I put it into the orange,
it finds its own height so it's not going too deep.
I've got a couple of peel slices here.
The cuts were definitely deep enough.
So second one.
I think that was rather successful
for what it's designed to do.
I'm gonna give it a little harder test.
I am going to cut this orange peel in a spiral.
It's a little more stable doing this on the table.
Let's see what I got.
And what we have now is one perfectly-peeled orange
and one that could put back in the fruit bowl.
Okay, so that worked pretty well.
Let's try something smaller and probably with thinner skin.
I'm gonna try to do some slices on this lime.
Maybe this is why it's called an orange peeler,
not a lime peeler.
It just does not wanna peel as easily,
but it's not because the slices aren't deep enough.
It's time for happy hour.
Let's see how that compares
with using a plain old vegetable peeler
and a more specialized channel peeler.
[jaunty music]
Not as thrilled with that one.
Let's give it an effectiveness rating.
On a scale of five, I would give this a five.
Although the lime is a little stubborn,
I think that's the problem with the lime,
not the peeler itself.
Orange, you glad I gave you a five?
Let's try this again with the left-handed oil test.
Time to slipperize.
The Apostrophe Orange Peeler is made of stainless steel.
I can feel it being slippery already.
I've got a sharper blade here
but I don't feel like I'm gonna cut myself
because my hands are below the blade
and I don't see it slipping in any way that would cut me.
So I think we are peeled.
I'm actually a little surprised
because the shape is so amorphous.
I thought it would be a little more slippery
and a little more challenging.
But no, it's relatively easy.
Let's give it a usability rating.
On a five-point scale, I would give this a five.
For any product, when something works better
than you even thought it was gonna work,
it gets bonus points.
So let's talk about a redesign
or at least some thoughts about design improvements.
I'm gonna be a little hard-pressed here
'cause I like it the way it is.
It's so basic and simple and it seems to work really well.
I think I would experiment
probably just doing some real simple 3D prints
with how bulbous this part is.
I think I'd try one that's maybe a little bit rounder.
If I was thinking of branding it, I may give it an eye.
Cute.
Here's one other thing I may consider.
Right now, it comes to a point.
I would consider a spatula shape
or like a rounded screwdriver shape,
so that once you make the slices,
you'd be able to dig in and start that peel coming up.
Right now, what I had to do
is once it was sliced when I did the horizontal slices,
I had to dig my finger or fingernail in there
to get it started.
So again, that's a pretty minor improvement,
but I would think
there'd be some experimentation I would try,
but I'm not sure I'm gonna get any major improvement
over what we have now.
So I'm gonna give it a buy rating now,
and this one's gonna be a little tough
because I like it a lot,
but it costs $40.
Just gonna go right down the middle
and give it a three out of five.
It's not for everybody,
it's for orange lovers.
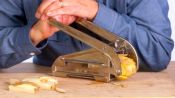
Cast-Iron Spice Grinder.
This is the Cast-Iron Spice Grinder.
It promises to pulverize your peppercorns
with the power of cast iron.
Let's see how it works.
I'm filling it with white peppercorns.
I'll just put a few in there to get started
and I'm going to push and turn.
[spice grinder vibrating]
I'm gonna stop here for a second.
Want to see what I have.
What I have is ground pepper,
but also couple of completely intact peppercorns,
probably more than I would want.
Let's give it a few more.
[spice grinder vibrating]
And it's looking a little more respectable
in terms of being ground.
I do have various sizes of pepper.
I'm not sure if you could see this,
but as I push down and twist,
I'm getting no action out of the inner piece
that it's supposed to do the grinding.
So I may be addressing something like that in the redesign.
Let's compare the Cast-Iron Pepper Grinder
with the way the Ancient Romans used to do it,
the stone mortar and pestle.
[jaunty music]
I feel like the mortar and pestle is more effective
and a little more satisfying.
For an effectiveness rating.
On a one to five scale,
I'm gonna give this a one.
I don't think you're gonna be that happy with it.
The mortar and pestle is gonna serve you better.
Just had more expectations for this.
In terms of usability,
I would also give it a one out of five
and no better than that.
Took a lot of spinning, a lot of pushing,
and it just had more promise than it actually delivered.
So let's talk about a redesign.
One of the things that's curious here
is what I've gotta do to make this grind
is I've gotta place the peppercorns, of course,
put this on top, place this wooden lid on top.
Then, I've gotta actually grab this ring,
the upper part of the inner piece,
in order to make it spin.
Otherwise, I'm just spinning the top
and doing absolutely no work at all.
I'm not sure why this piece
doesn't key into this inner piece,
so that when I spin the top,
this inner piece will also spin.
So one way to solve that is to just make this notch
into the rim of this inner piece.
A few times around, maybe four times would be fine.
What I would also experiment with
is that it didn't feel like it was effectively grinding
the peppercorns.
I don't know if you could see it,
but there's a little diamond pattern here
and there is a similar diamond pattern
at the bottom of this cup,
and I'm not sure those diamonds are that effective.
I would consider the fact
that because this is spinning at a circular pattern
that is designed to crush peppercorns that are spinning
would be more effective.
Whether that means that there's a spiral in here,
or concentric circles,
or some sort of other shape down here
that would work a lot more effectively,
I'm not sure, that's what prototypes are for,
but I would experiment with that.
Even with these improvements,
I'm not sure it's going to beat out
some of your alternatives for grinding pepper.
For a buy rating, I would give this one out of five.
I just can't recommend it.
It takes a lot of work,
it's not that effective, and it's crazy expensive.
Cast-Iron Pepper Grinder,
if I was your parent, you would be grounded.
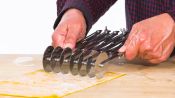
Toss & Chop Titanium Scissors.
This is the Toss & Chop Scissors.
It claims to allow you to make tossed salad in no time.
Let's give it a go.
We are chopping some romaine lettuce.
It's working really well,
but I'm not sure it's opening as much as I would like
as I'm not getting into the crevice of the scissors.
The lettuce is just a little too big for that to happen.
Now, let's see what happens with iceberg lettuce.
And this is okay.
Again, I can decimate this lettuce pretty easily,
but I do wish these blades opened up just a little bit more,
so I can get a little more in there as I cut.
Let's try scallions.
And this goes pretty quickly,
and I can get it into the crevice,
which makes cutting easier.
Let's try tomatoes.
This one, I am not too sure about.
Let's stand back.
Well, that worked pretty well.
Why make a salad if you can't put bacon in it?
So let's try that.
And the bacon was really easy.
And the egg,
I feel like I'm gonna end up with an egg and three slices,
and that took no effort.
Of course, that's the thickness of the egg.
You're not gonna get any thinner than that.
So you can certainly chop it further
and that's pretty effortless.
Let's see how the Toss & Chop Scissors
compare with using a good old-fashioned knife.
[jaunty music]
One of the things I liked about the knife
is I felt a lot more in control of the output.
Let's give this an effectiveness rating.
I'm gonna give it a two out of five.
It took a lot of work,
and I think you may already have scissors in your drawer
that are gonna do just as well
and maybe a little less effort.
I wasn't totally thrilled with it.
Usability rating, I was getting really fatigued.
Someone with some less strength
or some issues with gripping or dexterity
is gonna experience some problems
before they get through the whole salad.
I think I would give that also a two out of five.
It's too bad because it actually looks a little more capable
than it actually is.
Looks can be deceiving.
So let's talk about a redesign.
One of the things you're fighting here is the spring
because as you're squeezing,
you're actually squeezing not just the vegetables,
but the spring.
The spring has push to it.
Or you do want that spring to be strong enough
so that it opens up, the scissors don't get stuck.
That said,
I think this spring maybe is just a little too stiff.
So thing to do there would be experiment
with different forces of spring.
The other thing I would look at
is whether or not it's possible
to change the shape of this blade
so it has a bigger opening here.
When you come down, there's quite a bit of overlap,
so the blades are gonna cut.
So I think we have some room to reduce that overlap.
And by reducing the overlap,
we're gonna create a larger area here for the vegetable.
'Cause of that,
you're gonna get more squeeze leverage when you pull down.
And I think that would be something to look at.
This comes up a lot with squeezed tools.
It is very important to get the pinky involved
and get as much of the pinky involved as possible.
And that would take a couple of shape experiments.
One way to do that would be to possibly shorten this
and extend this up,
so that the pinky sits here.
But the goal would be we're giving more room here
for the pinky to do some squeezing.
Let's talk about a buy rating for the Toss & Chop Scissors.
I'm gonna give it a solid two out of five.
I wasn't that thrilled with using it.
It took a bit of work.
I think you'd be better off
spending your gadget dollars elsewhere.
So five high-priced, maybe overpriced, gadgets.
I really had higher expectations.
I was kind of disappointed.
I was looking forward to trying all of these.
Perhaps the higher price point
comes from the materials being used.
But in terms of performance or usability,
I think you're better off looking at these
than you are actually using them.
For almost all of these gadgets in this episode,
I just wanna say, give me my money back!

5 Opening Kitchen Gadgets Tested by Design Expert
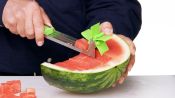
7 Slicing Kitchen Gadgets Tested by Design Expert
5 Peeling Kitchen Gadgets Tested by Design Expert
5 Egg Kitchen Gadgets Tested by Design Expert

5 Seafood Kitchen Gadgets Tested By Design Expert

5 Ice Cream Gadgets Tested By Design Expert

5 Pizza Cutting Gadgets Improved By Design Expert
5 Avocado Kitchen Gadgets Tested By Design Expert
5 Salad Kitchen Gadgets Tested By Design Expert

5 Wine Opening Gadgets Tested By Design Expert
5 Bartending Gadgets Tested by Design Expert
5 Cake Making Gadgets Tested by Design Expert

5 Breakfast Kitchen Gadgets Tested by Design Expert

5 Fruit Kitchen Gadgets Tested by Design Expert

5 Vegetable Kitchen Gadgets Tested By Design Expert

5 Cheese Gadgets Tested by Design Expert

5 Coffee Making Gadgets Tested By Design Expert

5 Gadgets From "Shark Tank" Tested By Design Expert
5 Pasta Making Gadgets Tested By Design Expert
5 Cutting Kitchen Gadgets Tested by Design Expert
5 Sandwich Gadgets Tested By Design Expert

5 Brunch Gadgets Tested By Design Expert

5 Nut-Cracking Gadgets Tested By Design Expert

5 "As Seen On TV" Gadgets Tested By Design Expert
5 Vintage Kitchen Gadgets Tested By Design Expert

5 Cleaning Kitchen Gadgets Tested By Design Expert
5 Chopping Kitchen Gadgets Tested by Design Expert

5 90s-Era Kitchen Gadgets Tested By Design Expert

5 Decorating Kitchen Gadgets Tested By Design Expert

5 Mixing Kitchen Gadgets Tested By Design Expert

5 Straining Gadgets Tested By Design Expert

5 Japanese Gadgets Tested By Design Expert

5 Taco Making Gadgets Tested By Design Expert
5 Deep Frying Gadgets Tested By Design Expert

5 Kickstarter Gadgets Tested By Design Expert
5 Portable Kitchen Gadgets Tested By Design Expert

5 TikTok Gadgets Tested By Design Expert
5 New Gadgets From "Shark Tank" Tested By Design Expert

5 High-End Kitchen Gadgets Tested By Design Expert